
If you had watched the first demo of Frappe Studio, and ever wondered how it all came together behind the scenes, this blog breaks down the internals of the POC version:
The Idea
Frappe Framework is a solid backend engine, but the frontend has its limitations:
- Views are tightly coupled to the data structure / DocType
- Creating custom views with multiple data sources is hard
- You often need to jump across multiple screens to complete one workflow
While this kind of consistency is really powerful for business apps like ERPNext, sometimes for some apps/screens we also need composability.
So in April 2024, Gursheen and I started a complete framework client-side rewrite to support a modern frontend stack using Frappe UI. But after a point, we realised that our core goal to empower users to "compose" their own powerful frontends was getting lost in the complexity of maintaining feature parity.
Then came the Frappe Offsite (“Refresh”). During a casual discussion on how to improve Frappe UI, Rushabh casually walked in and said - “Why not just build a low-code app builder from scratch?” One that brings together:
- Frappe Framework
- Frappe UI components
- A composition tool like Frappe Builder
He also suggested putting together a POC (Proof of Concept) for Frappeverse 2024 that was ~1.5 months away. Since the rewrite was already shelved, I decided to give it a shot. I put up a sticky note beside my desk with the deadline for motivation 🙈.
Why not build inside Frappe Builder?
Before you ask — yes, I did try using Frappe Builder for this. Suraj Shetty (creator of Frappe Builder) even suggested forking the repo and stripping out parts that weren't needed. But very quickly, I found myself removing more than I was adding, and my smol 🧠 was unable to keep up with this approach.
Frappe Builder is focused on first-class web publishing, while Frappe Studio needs to provide a full-fledged app building experience. The two tools differ significantly in their goals and approach—especially in terms of building blocks, design flexibility, and rendering. The rendering output of Frappe Studio is a dynamic Vue Single Page Application (SPA), whereas Frappe Builder outputs websites using HTML, CSS, and JavaScript.
So I restarted from scratch.
1. Building Layouts
Canvas and Style Panel: I reused the base canvas from Frappe Builder with pan & zoom, resizing, and component styling utilities for the style panel. This gave me a solid starting point for layout building.
Component Panel: I loaded all the frappe-ui components into a component panel for easy drag-and-drop access.
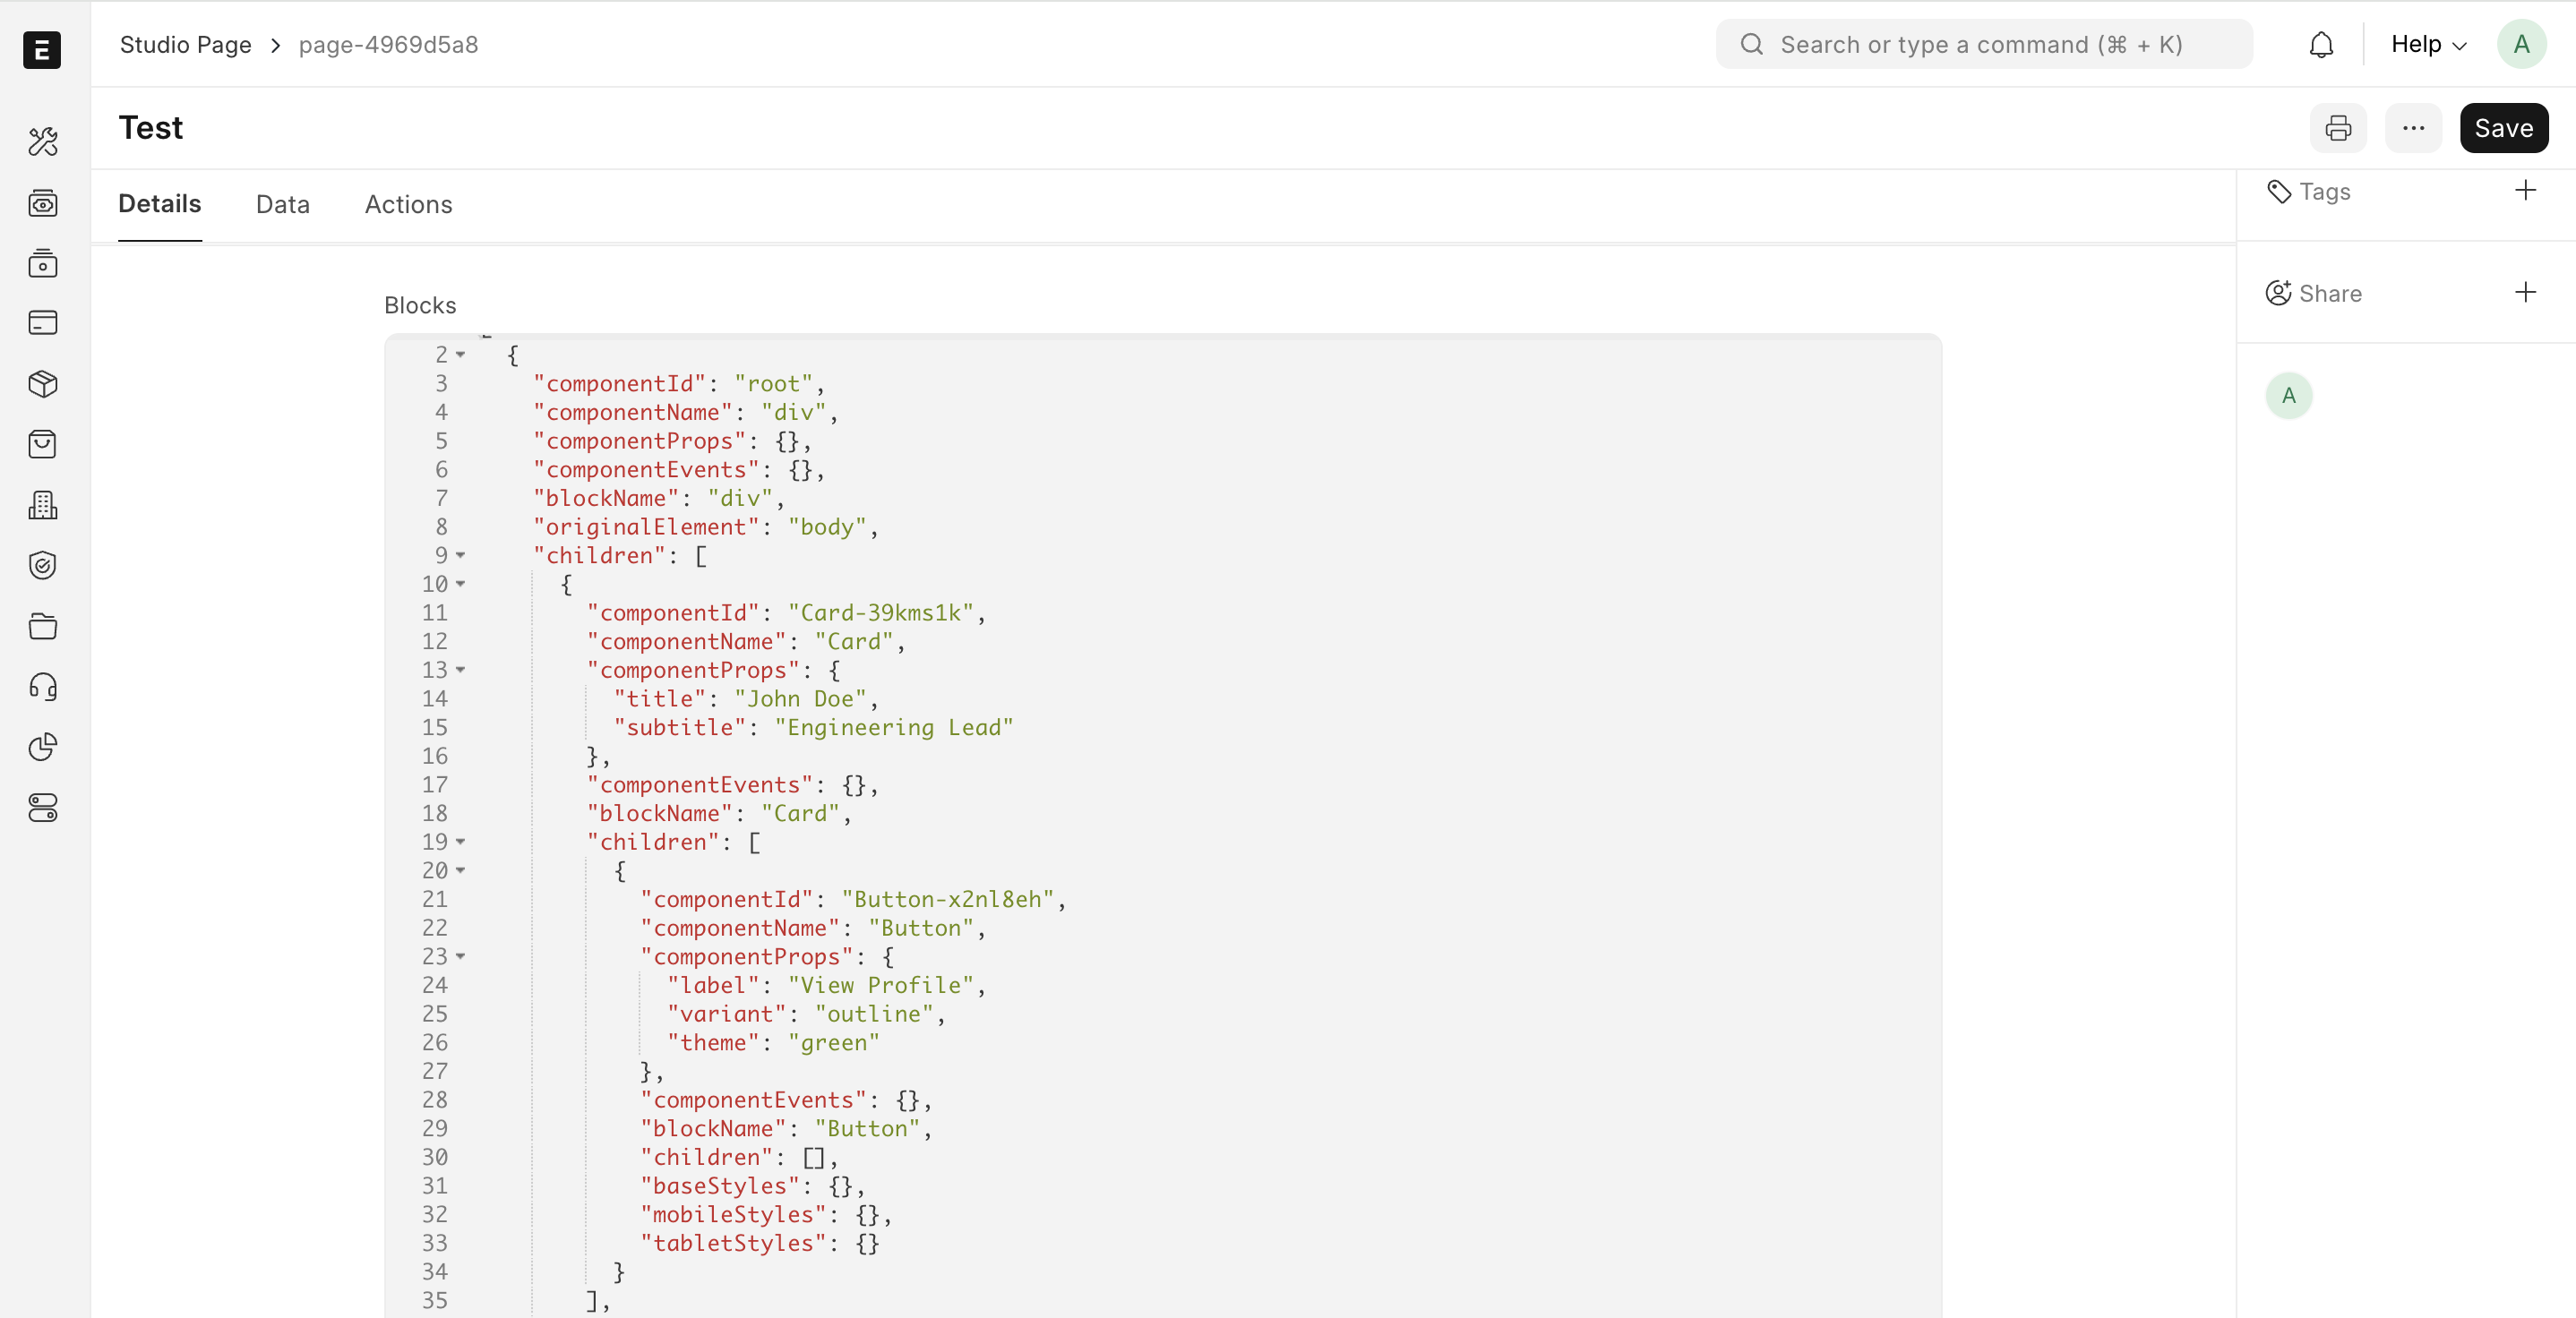
Backend: Similar to how Builder stores the entire block structure with styles and builds HTML from the block structure on rendering, Studio stores the component tree with component names, props, events, and styles and renders Vue components from this.
Component Selection on the Canvas: To allow users to select and edit components on the canvas, Studio sets a
data-component-idattribute on each rendered component. This requires access to the component’s root DOM node.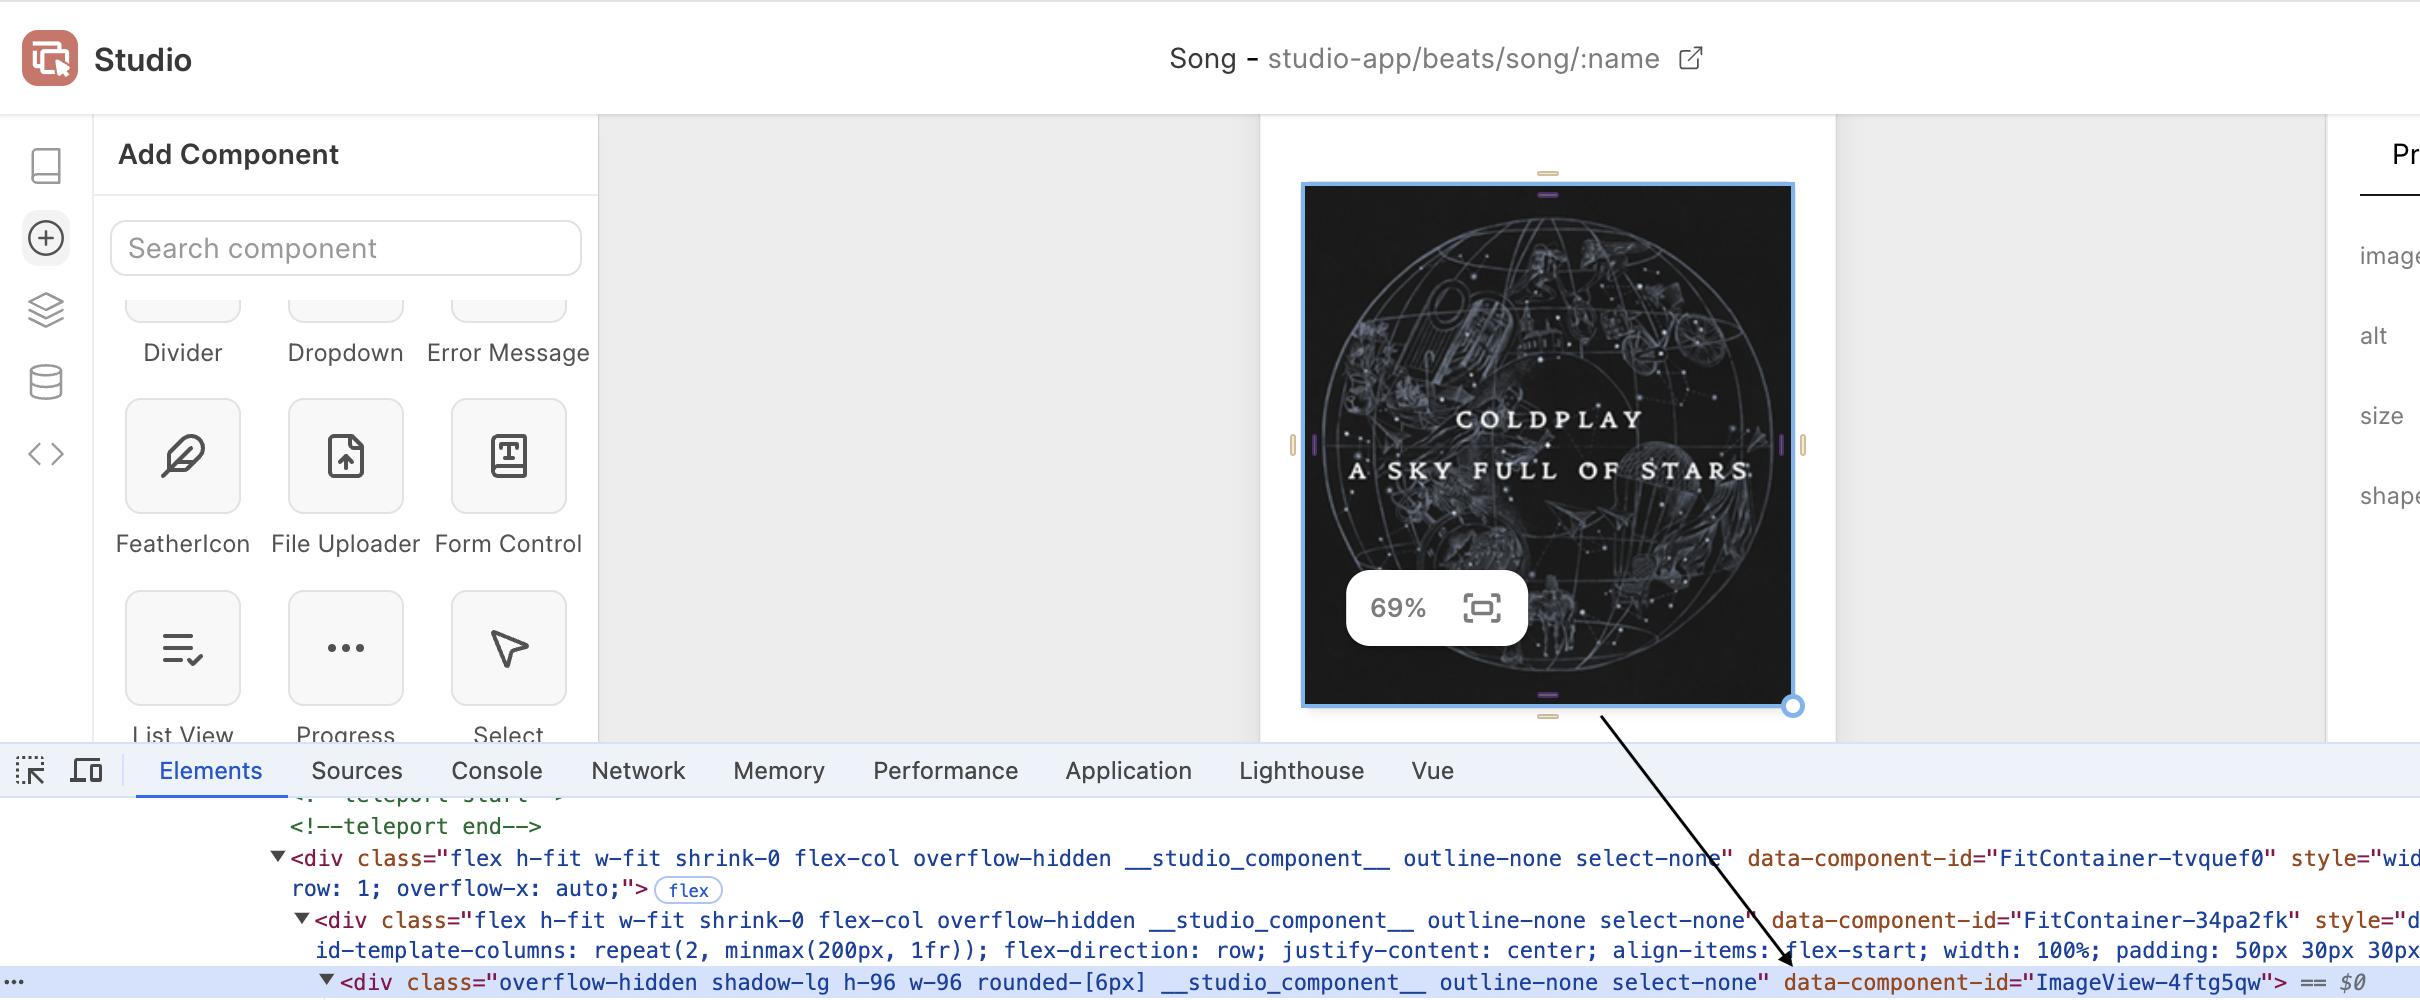
Normally, when a Vue component renders a single root element, fallthrough attributes like
data-*automatically attach to the root element. However, this doesn’t work for some frappe-ui components whereinheritAttrsis set tofalse. These components intentionally forward class/style bindings to internal elements instead of the root element. A good example isFormControl, where the root node changes based on the control type.Vue allows us to access the component instance's root DOM node using
component.$el. I tried using this after the component was mounted. However, I ran into issues—$elisn't always reliable. In some cases, especially with components like Popover or Autocomplete,$elpointed to aTextorCommentnode instead of an actual DOM element (why this happens).Since Vue’s Composition API hides internal refs by default, I had to explicitly expose a
rootRefin such components so the parent (Studio) could consistently access the correct root element.Editing Component Properties: When you
console.loga component instance, you can see its props, exposed events, emits, and more. I wrote handlers to dynamically render prop controls for both - Vue's Options API & Composition API, based on runtime type of each prop.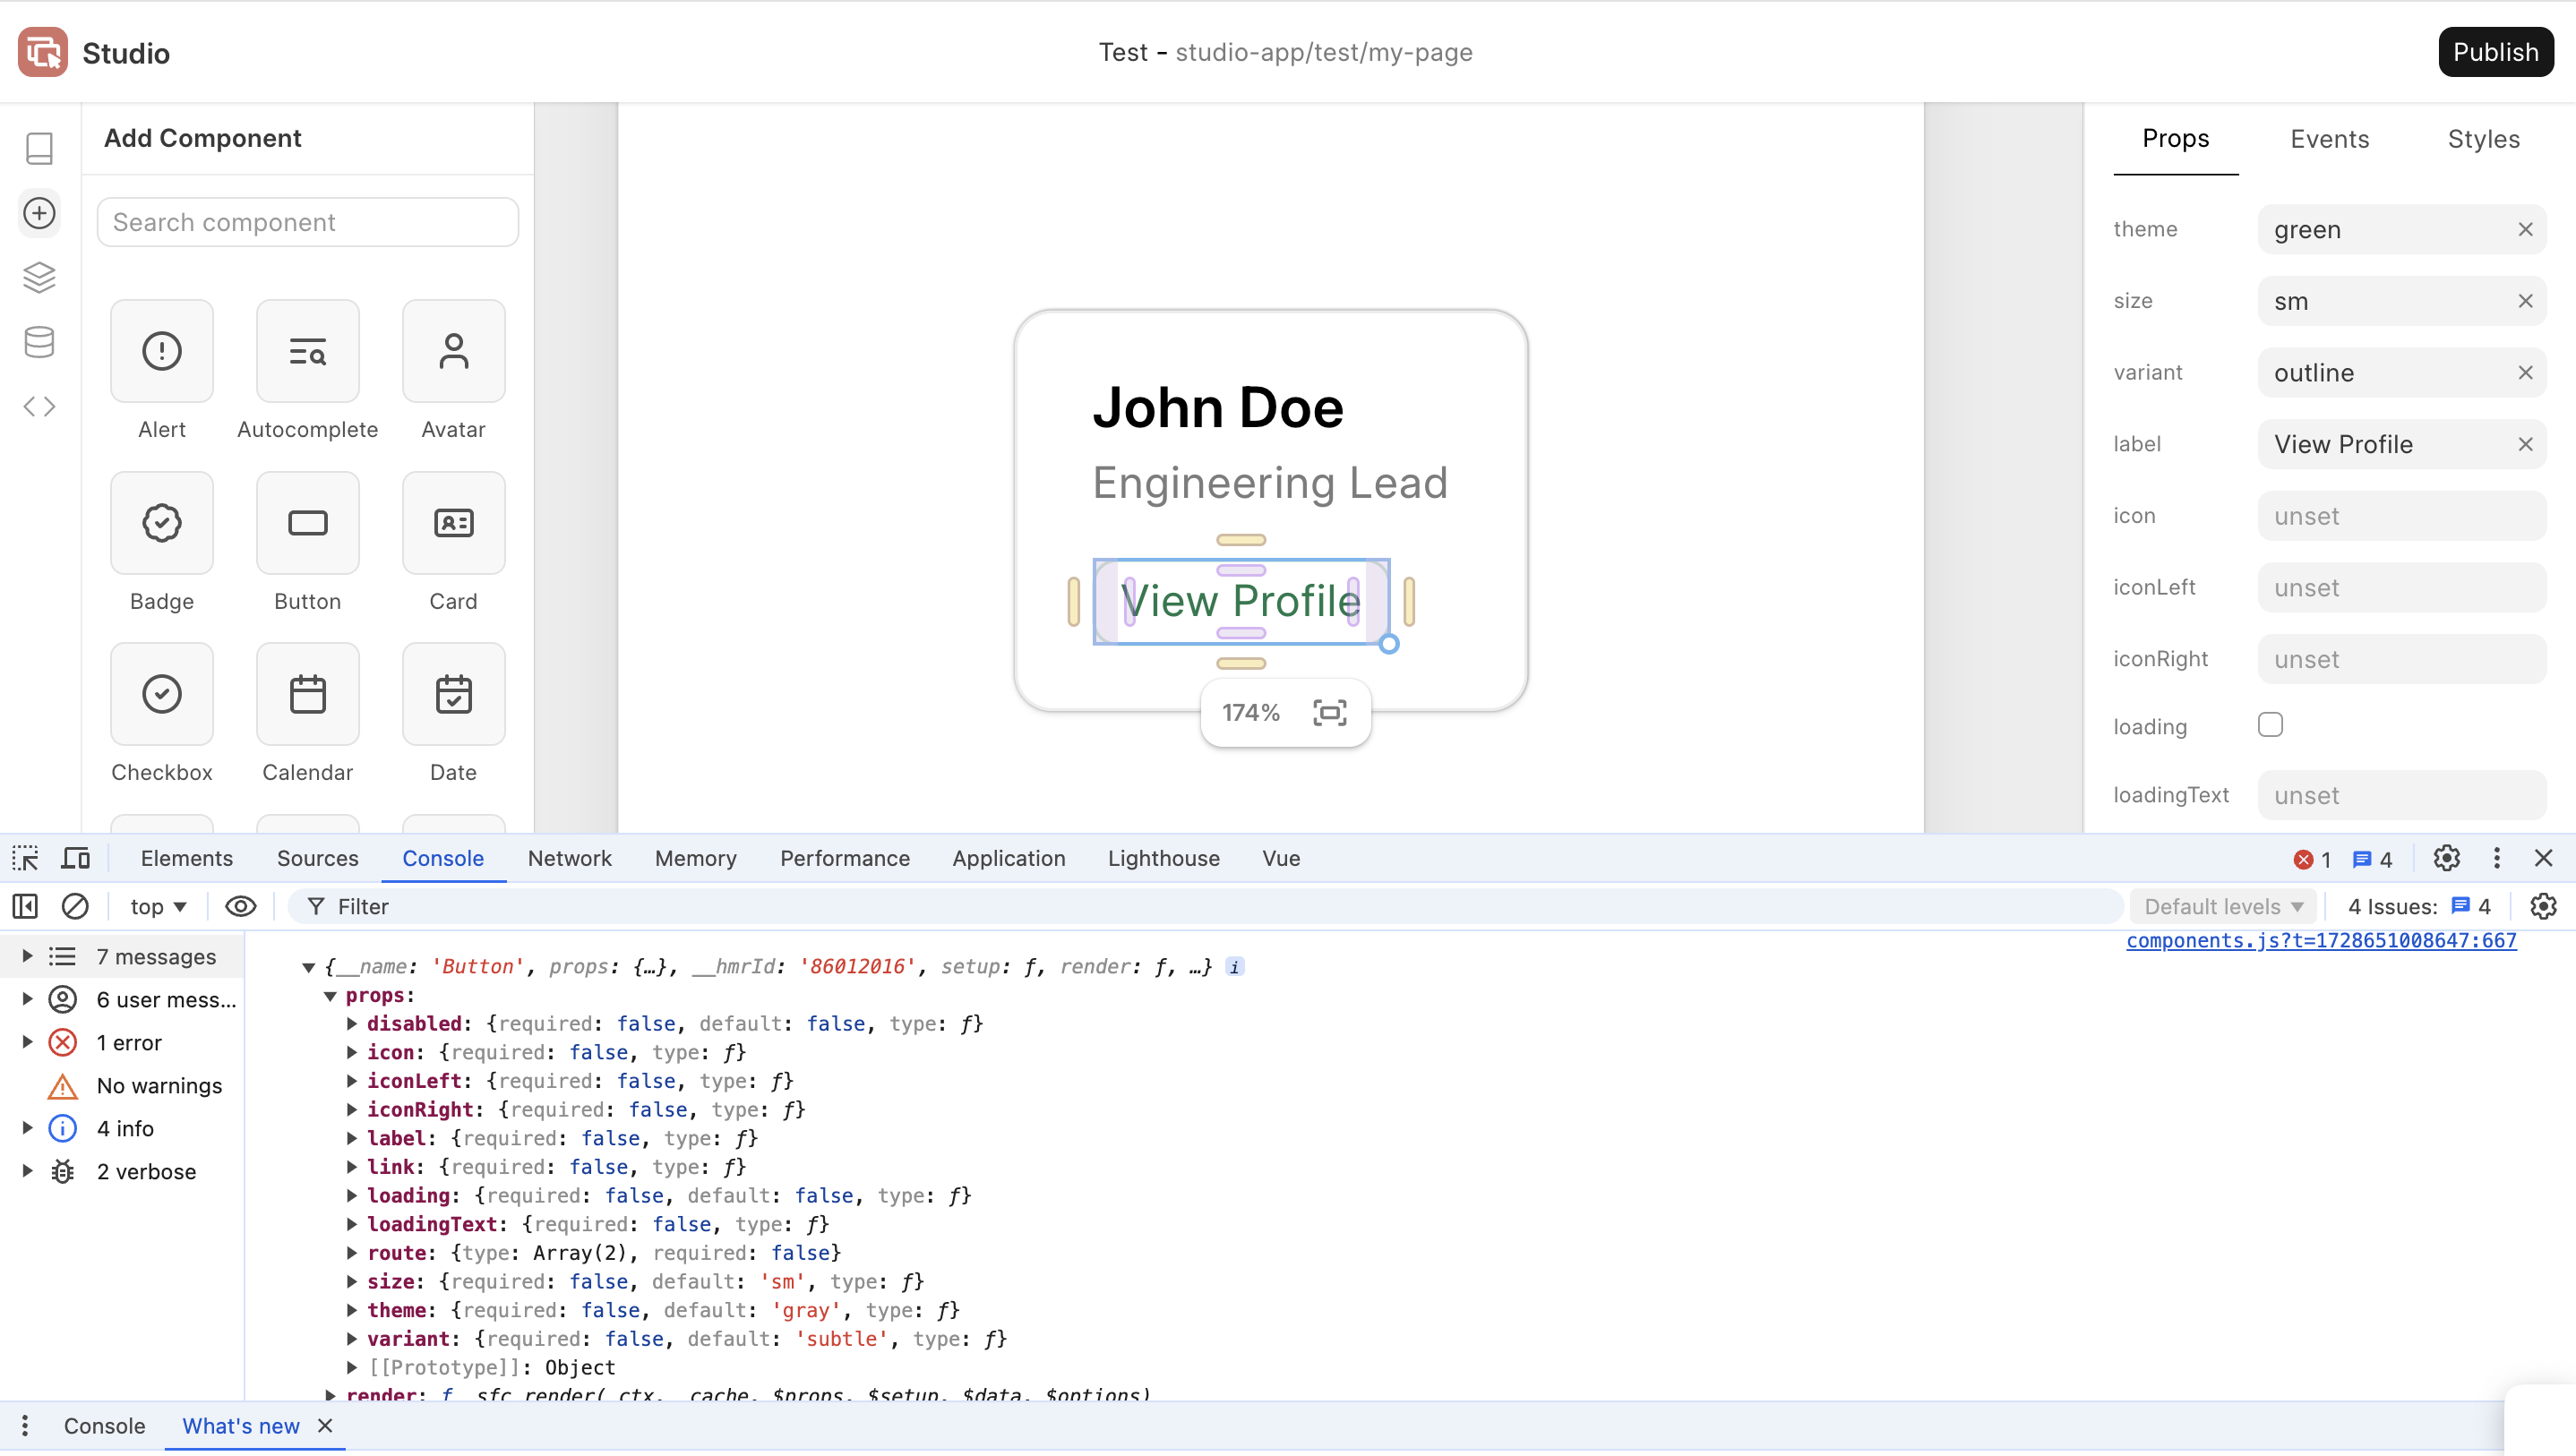
For the POC, prop editing was limited to basic inputs: text fields, checkboxes, and JSON editors (for non-primitive props). While some
frappe-uicomponents are typed, TypeScript definitions are wiped out at runtime. I had thought of a way to convert TypeScript types to JSON to extract more detailed info—like required props, string literals for prop options (e.g. button sizes: sm | md | lg...), and other metadata to improve the prop editing UX, which I worked upon later.If I had gone too deep into this during the first version, the demo wouldn't have made it to the conference at all. Along the way, I also learned to be okay with presenting half-baked or unpolished work—just to complete one full cycle and keep things moving.
Initial State for Components: Studio adds some
initialStatefor all components so that you can drop the components on the canvas and work on layouts without connecting them to actual data in the very beginning. This idea sprung out of looking at frappe-ui's storybook. Here's an example of how it looks in code: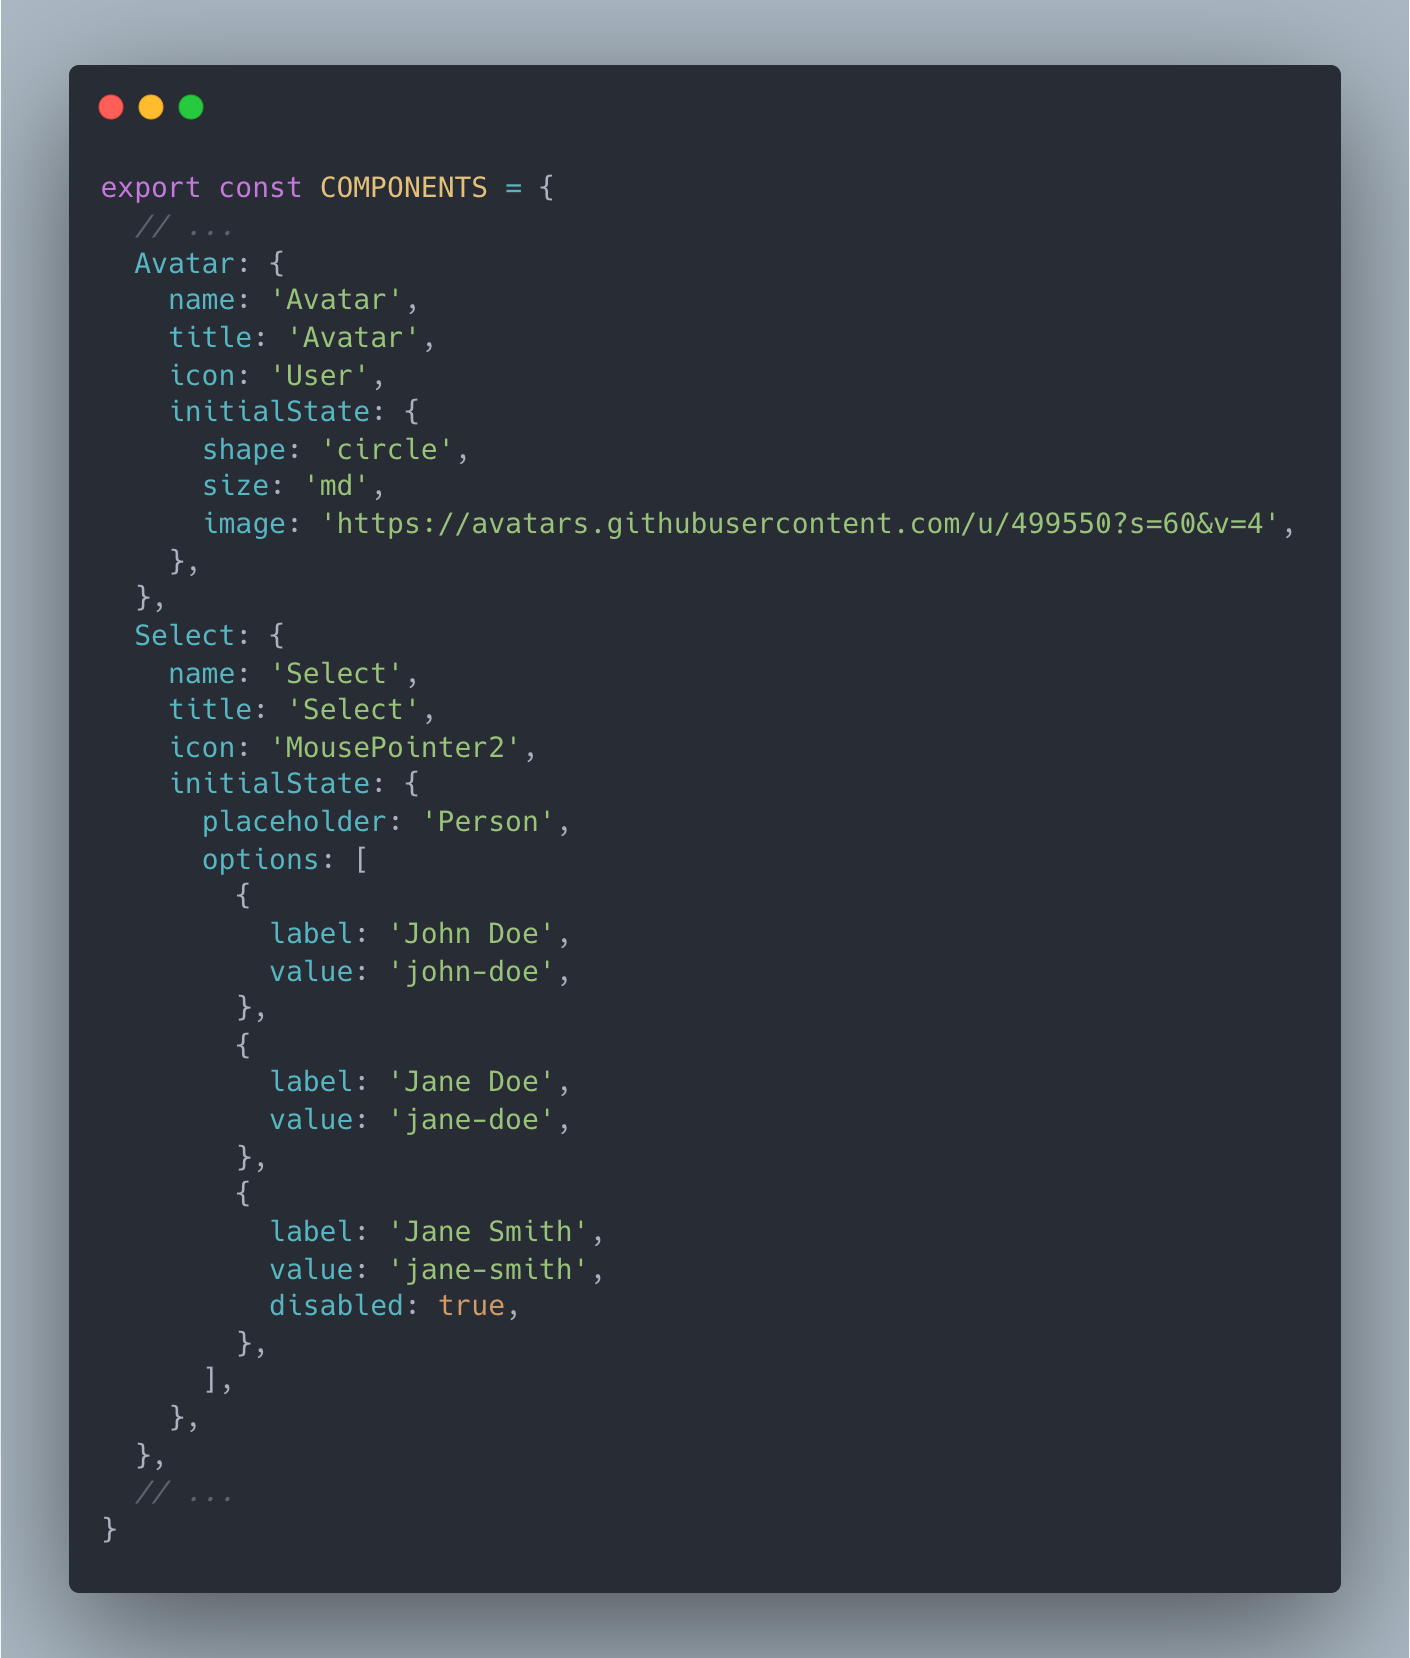
Studio Components: While frappe-ui has great primitive components - buttons, dialogs, controls, etc, I could not demo a full-fledged app with just these components. So I built some custom components and kept them inside Studio for the demo - ImageView, TextBlock, Audio, etc.
2. Connecting Data
Resources in frappe-ui is a powerful feature built by Faris Ansari to handle async data fetching and mutations in Frappe/Vue apps. It manages fetching, caching, and keeping the data in sync with the server. I decided to use this internally for connecting data in Studio.
You can create and attach resources to a page. To configure this:
- Select the type of resource: Document List, Single Document, API Source.
- Select fields, set filters.
- Transform results for some data preprocessing.

I also built an object browser for viewing the added resources for reference. This was fun ✨

3. Rendering
What will exactly happen on hitting "Publish" was a big question mark for me from day 1. I started exploring ways to render the app - looked into Vue's server-side rendering, even considered writing my own server-side renderer but couldn’t move to the action phase. The note beside my desk was nudging me to speed up, so I decided to handle rendering on the client-side itself.
In the POC version, Studio mounts a new Vue app instance with base route as /studio-app (because /app is taken by the framework 🥲) to render apps published by Studio. So route for a discover page in an app called beats would be: /studio-app/beats/discover. Here is how the app renderer is mounted:
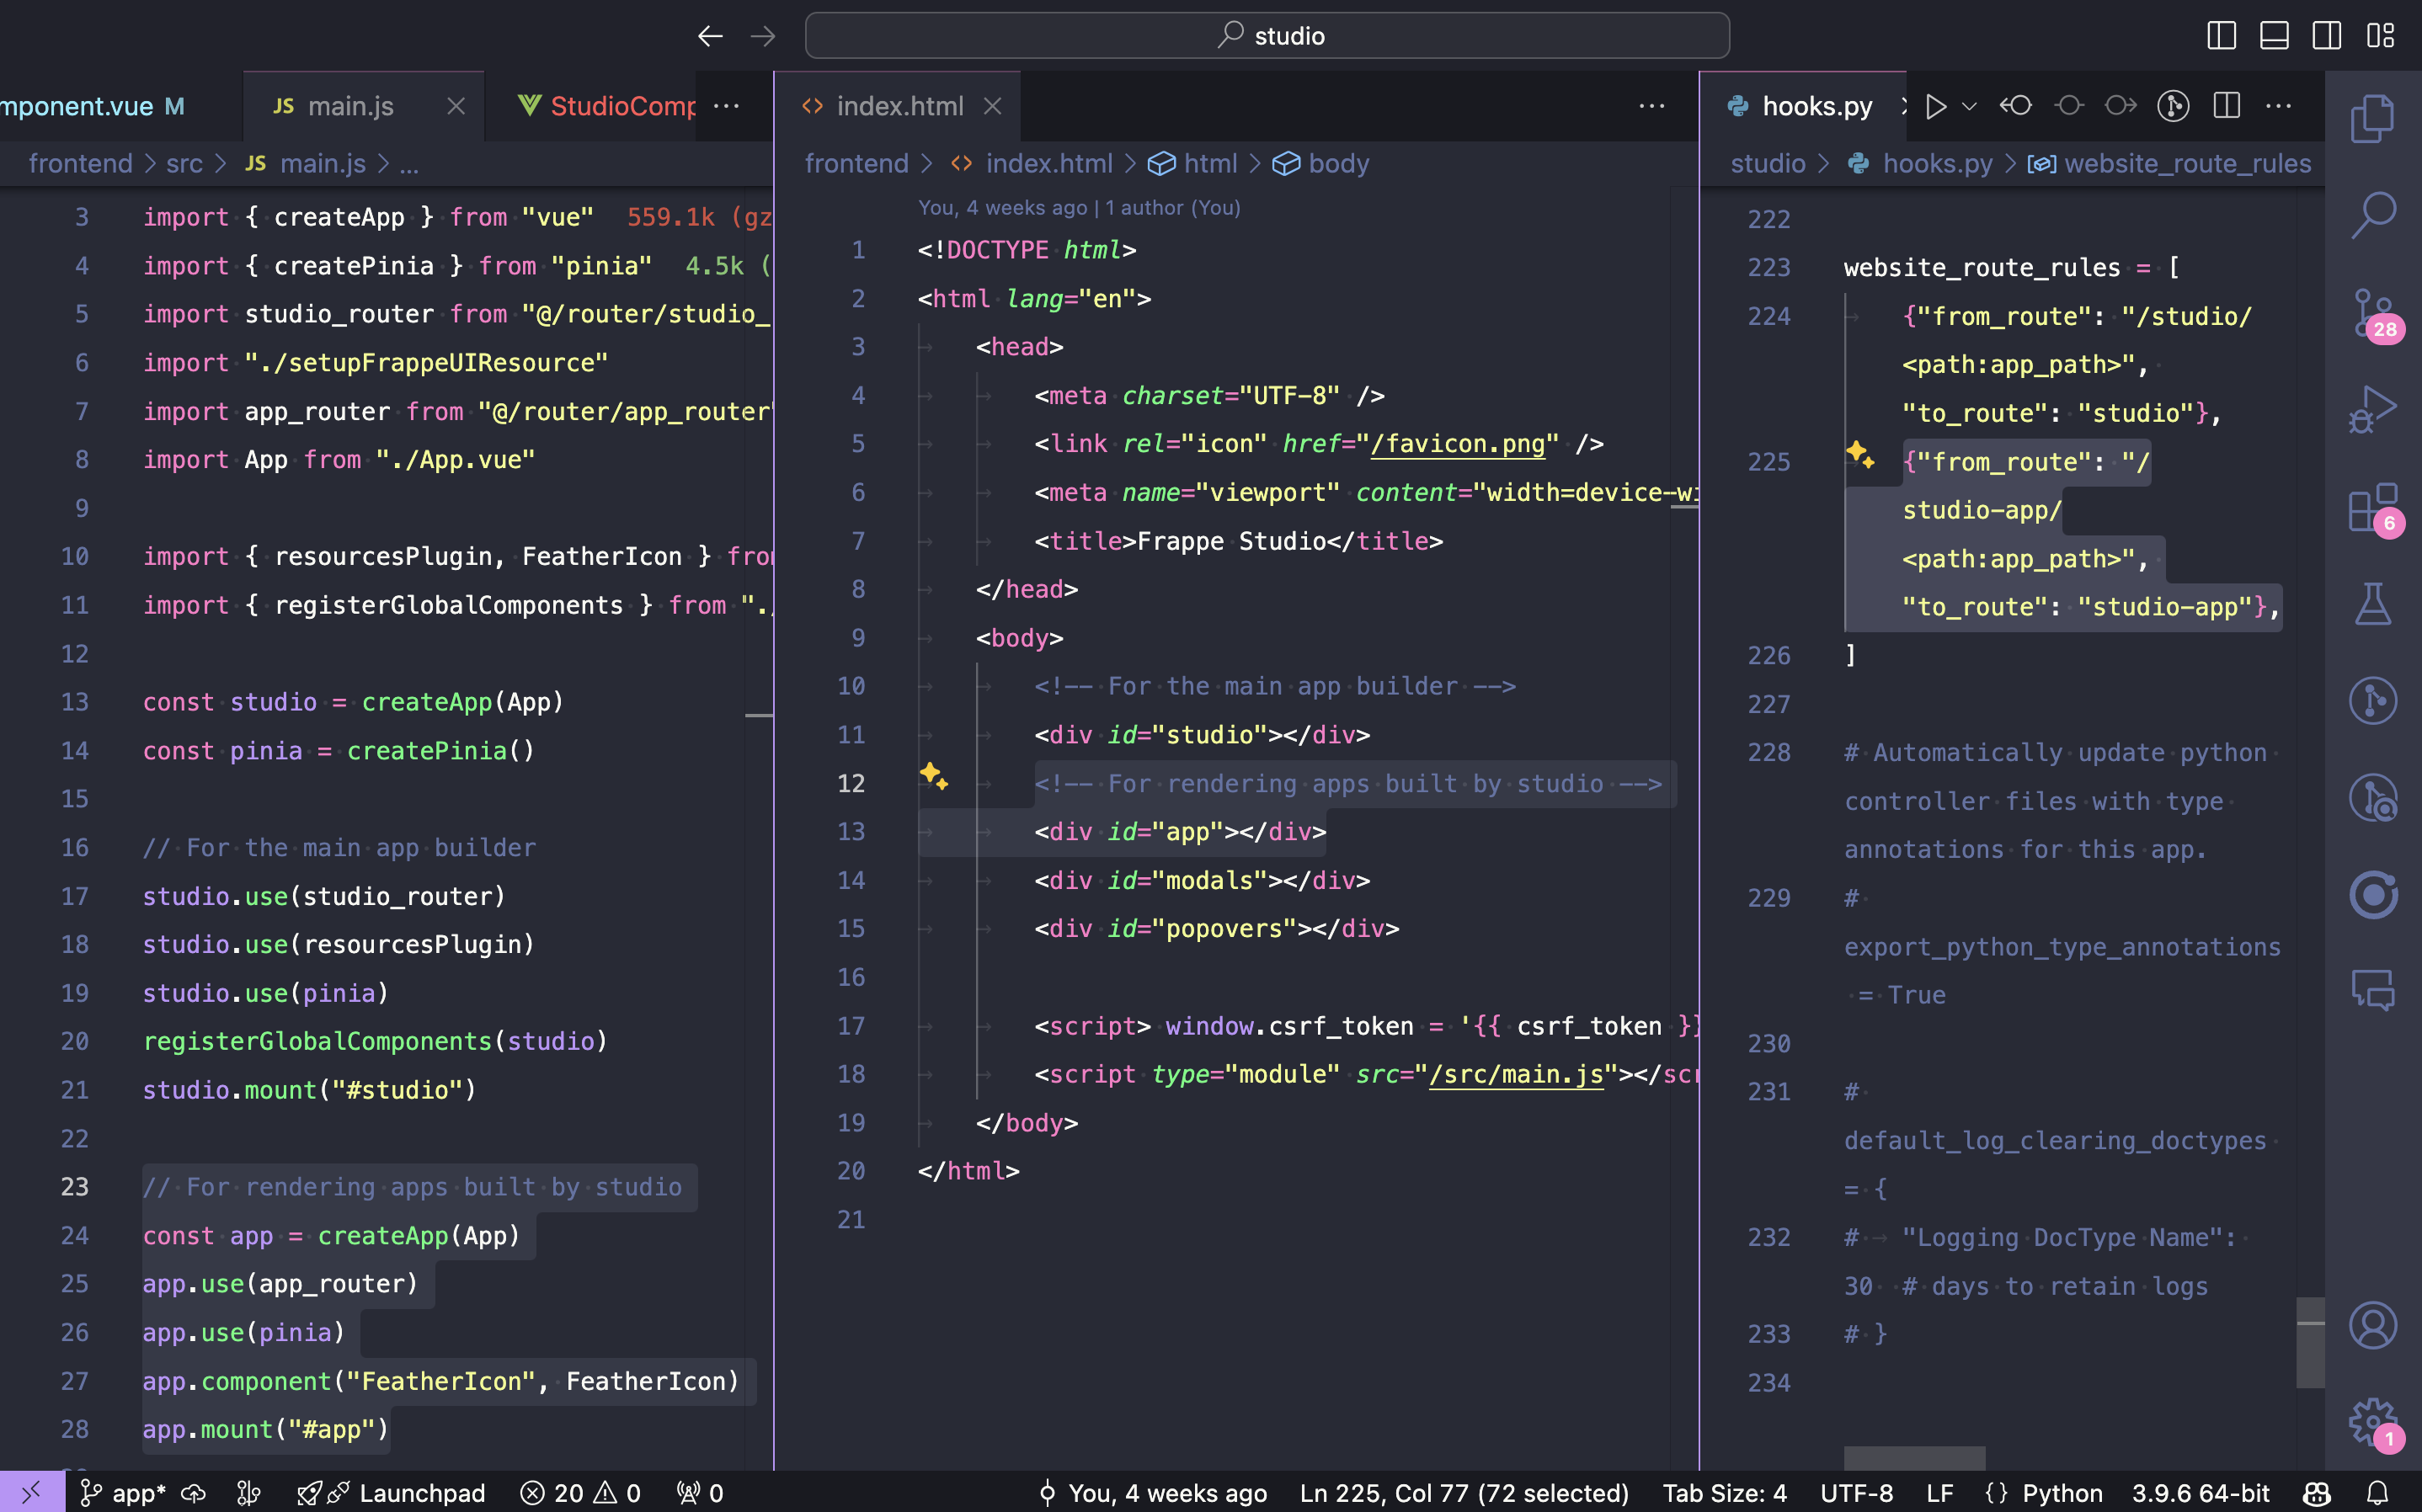
It has an AppContainer that fetches the page blocks stored in the DB for the visited route and spins the new app by rendering the dynamic component tree recursively.
4. Single Page → App + Complex Routing
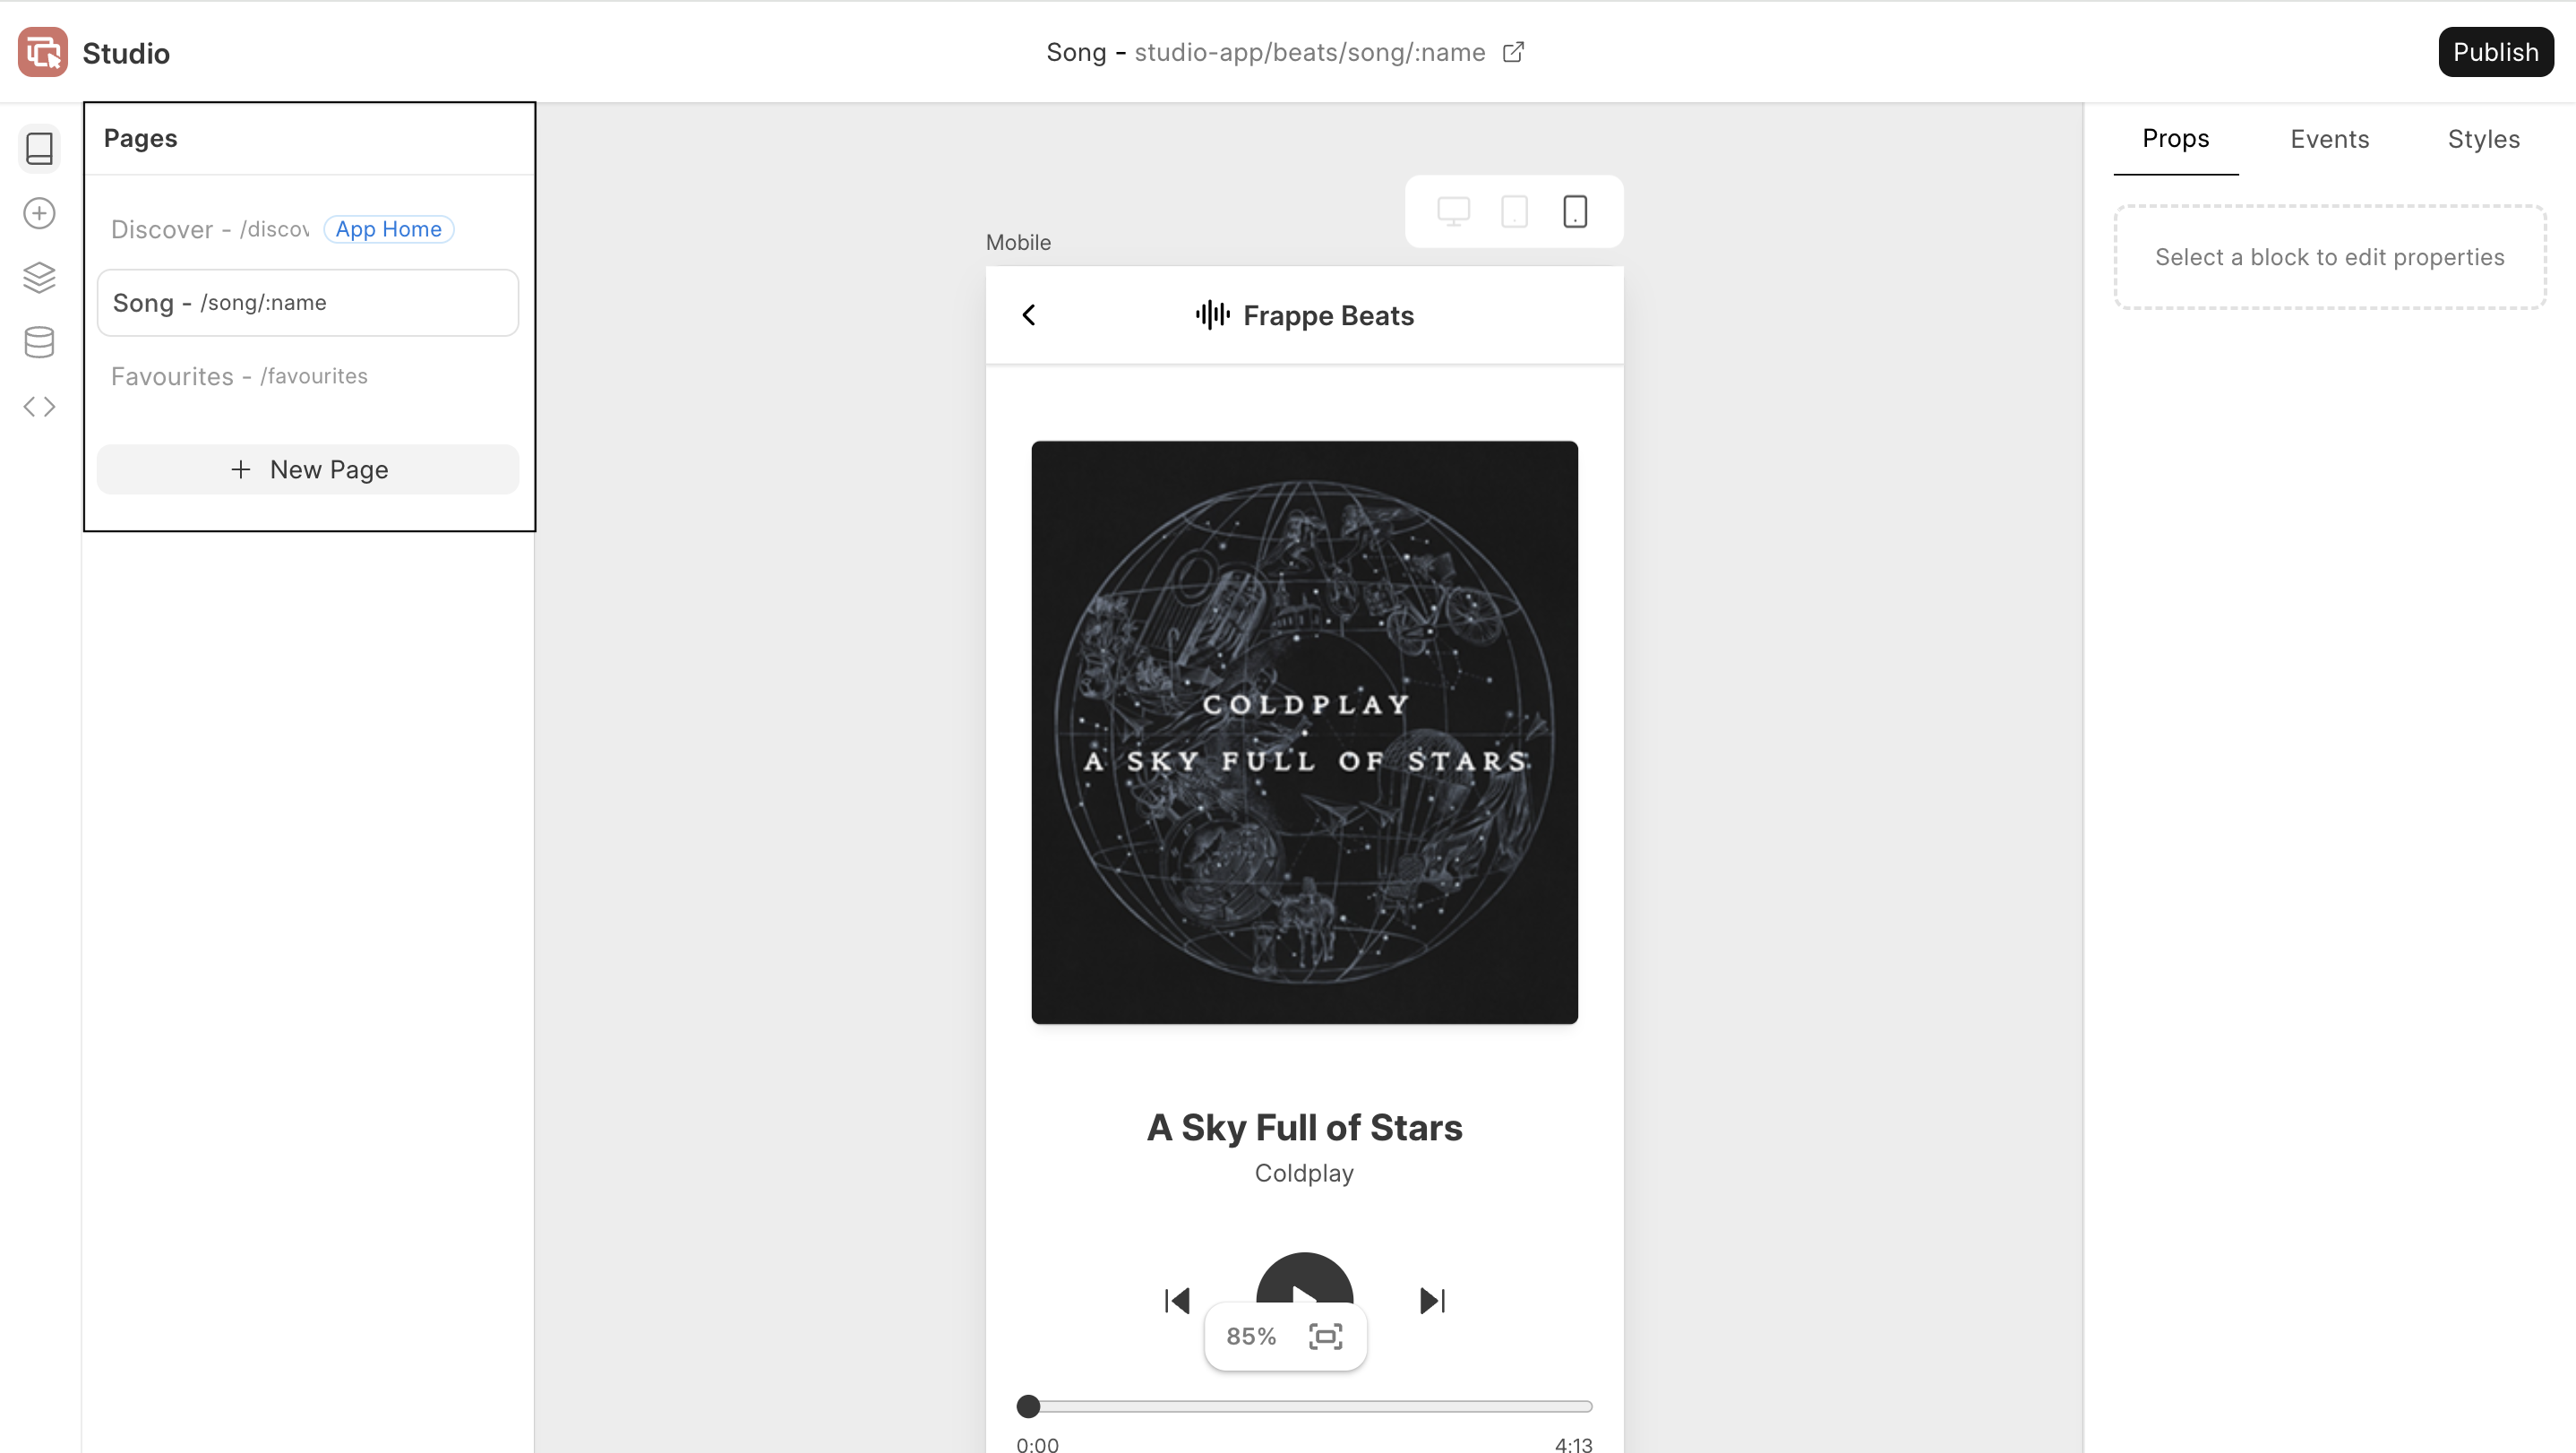
Once basic single-page publishing was in place, the next step was to support multi-page apps. So, I added a Pages Panel with route info and an "App Home" tag. You can switch between pages and edit them individually.
For rendering, I also needed to add dynamic routes on the fly. Vue makes this possible with router.addRoute, which lets me add all the user-configured routes to the router during the first render.
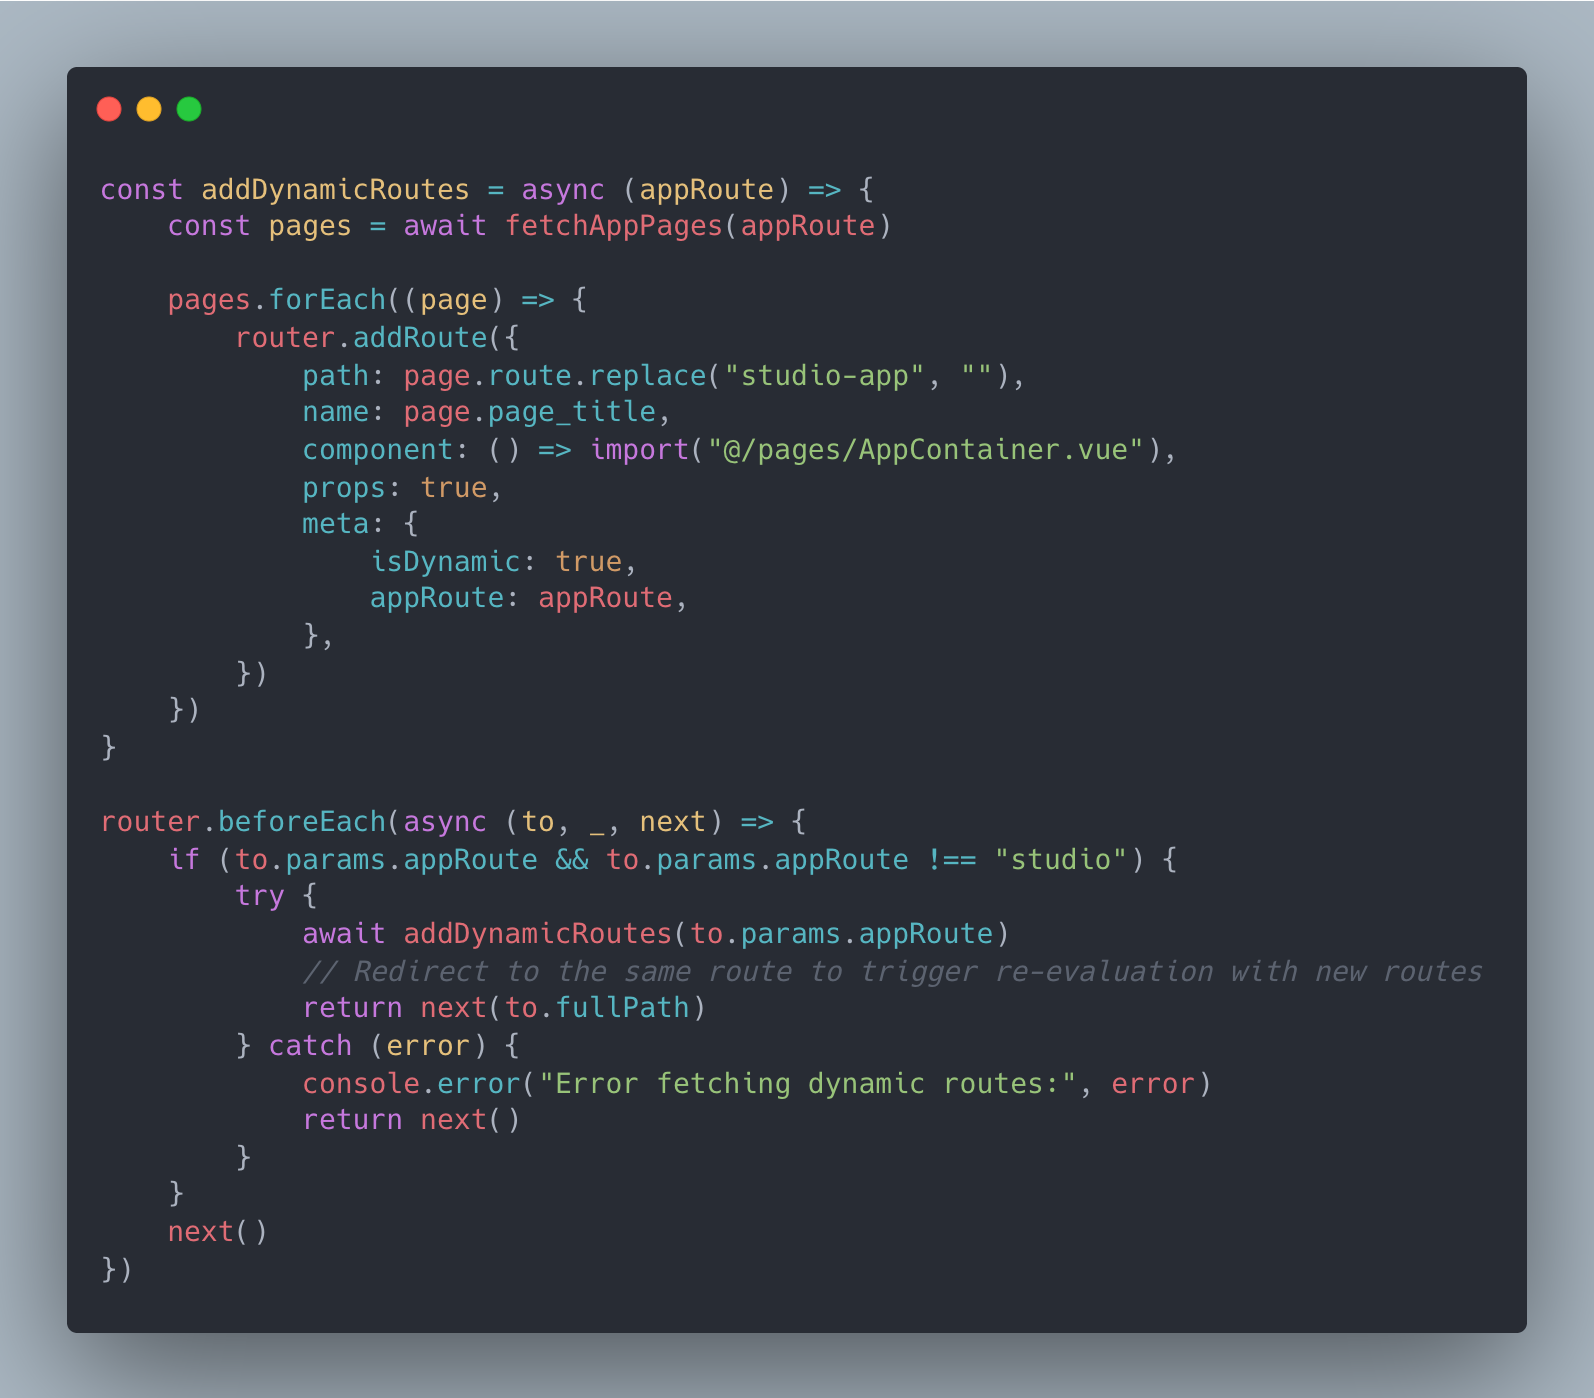
After the POC, rendering & routing were reworked significantly using the Frappe Framework's backend - maybe I'll cover that in a separate blog! 😄
5. Wiring Events & Actions
This was a day/two before the conference... Panik mode on 🗿
I finally added support for users to configure actions on component events — both default ones like click, blur, hover, and custom emits like onRowClick on ListView or close on Dialog.
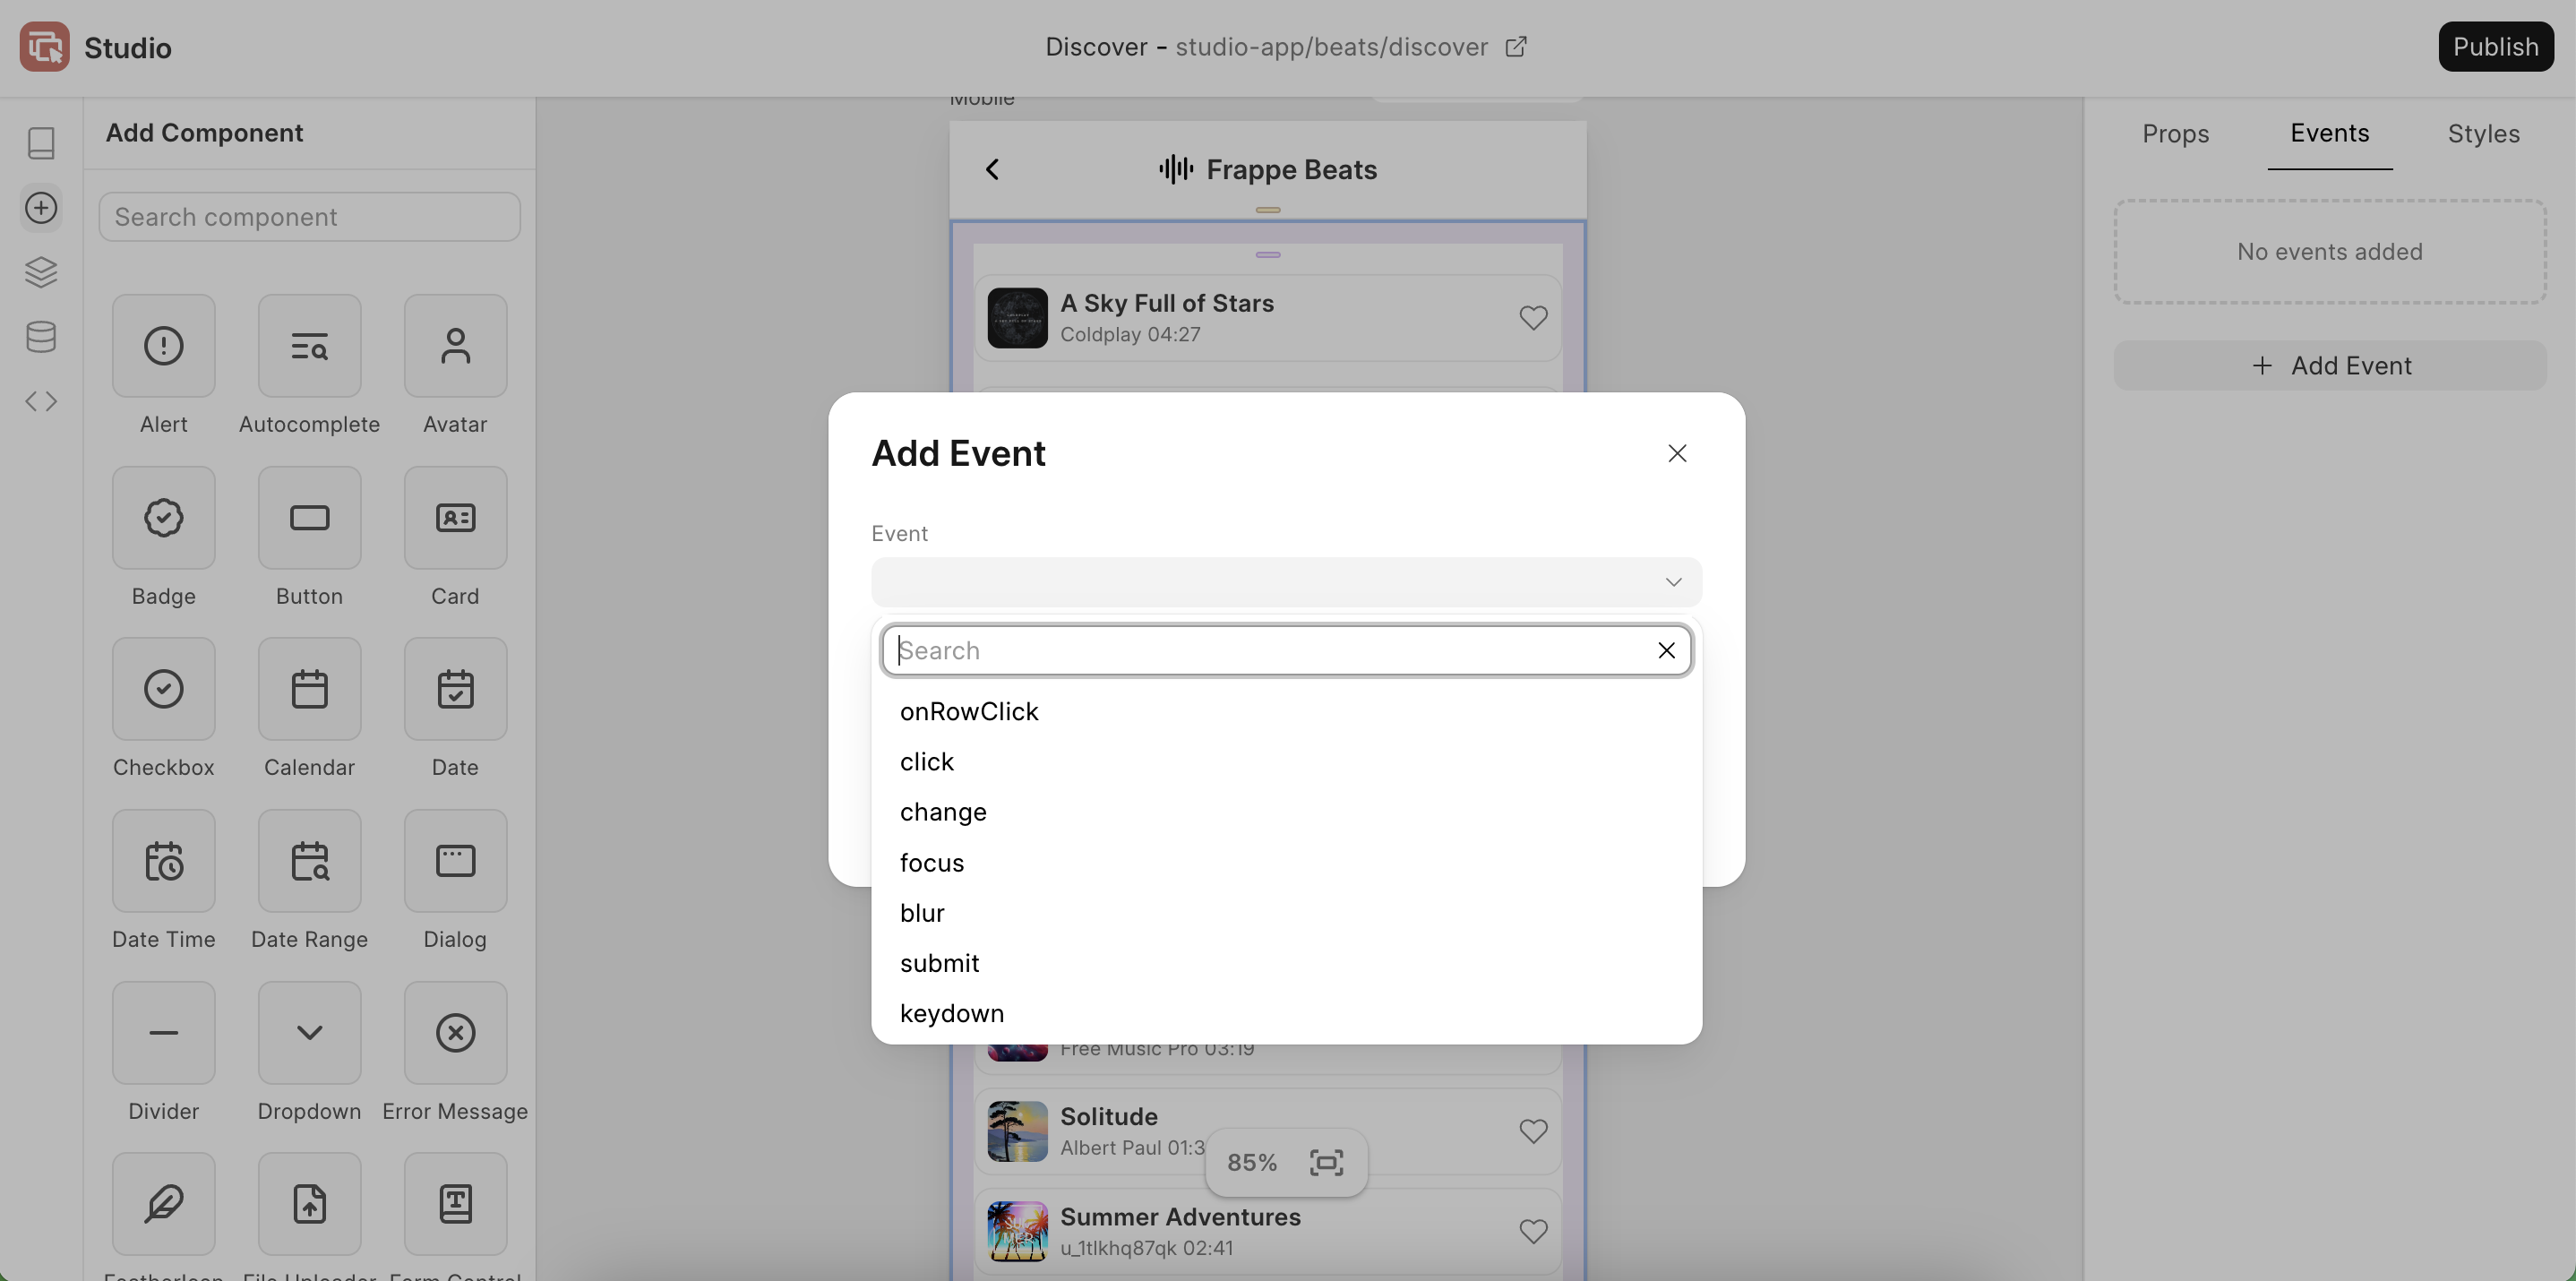
For the POC, I kept it simple: actions only supported API calls and Page Switching - just enough to get the demo running. Most of this was written a few hours before my Studio talk 🙈.
Finally, the demo went well (I think 😅).
You can follow the GitHub Repository for more updates and watch the full demo here.
This journey made me realise that sometimes, all it takes is catching the motivation at the right moment and holding on to it long enough to build something real. The experience was incredibly fullfilling for me as an engineer! Studio still has a long way to go before it becomes the go-to app builder, but I will try sharing my learnings and progress through blogs like this.


·
Hi, If erpnext was & is the bread better of Frappe as of now the real heart & soul will be Studio and the team developing will go in the history books. Kudos. Keep excelling professionally & personally. Your architecture background is the winner for this. Cant wait to see it on cloud.
·
A thoroughly detailed blog of Frappe Studio, I like how well you reasoned building a product from scratch instead of creating on top of Frappe Builder. Would love to connect with you.
·
Excellent blog Rucha, can you share some docs or demos(apart from the conferences tutorials). Regards, Shlok Gupta.